
- Sep 18, 2015
- Internet of Things
- #particle, #hardware, #IoT
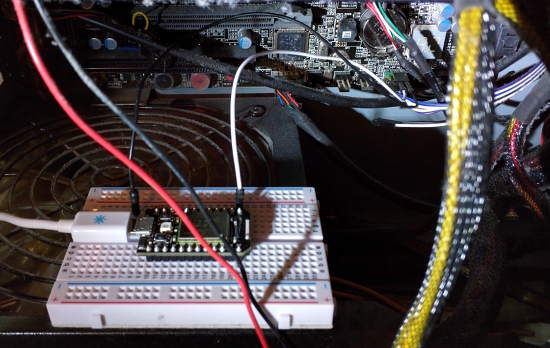
Here's a fun and quick but practical hack using a small Particle board to turn on and off a computer from anywhere over the internet.
This project takes under an hour and is a good little assignment for anyone looking into learning some basic hardware hacking with useful applications.
The Scenario
I have a computer in my apartment which I mostly use for playing video games, but sometimes I like to access it remotely over the internet to do server tasks for me. The problem though is that gaming desktops use a lot of electricity when they're running. So running the computer 24/7 would be too wasteful.
Instead, I want to be able to turn on my computer from anywhere on the internet; whenever I desire to use it remotely.
This can be achieved using "wake-on-LAN" (WoL), but unfortunately my desktop's motherboard is too old to support this. So instead, I decided to connect a Particle Core to my desktop's motherboard so it can turn on the computer for me!
Particle
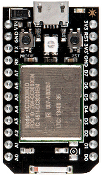
For this hack, I used a Particle Core because that's what I had laying around, but a Photon would work just as well and is only $19. For the sake of brevity, I'm going to skip the details of how to setup and configure your Particle device. If this is your first time using Particle, they have a tutorial here.
ATX Motherboards
My motherboard is an ATX, but the process should be similar for other common motherboard specifications.
So how does pushing the power button turn on your computer? Your motherboard has two pins on it which are used to turn on the computer:
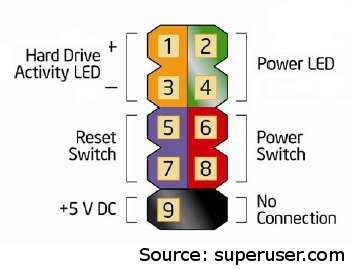
One of the two pins (labled Power Switch in the above diagram) holds a 3.3V to 5V charge and the other pin is ground. When you press the power button, the circuit is completed, allowing the charged pin to discharge into the ground pin. This drop in voltage is detected by the motherboard which serves as the signal that it's time to power up.
For our project, we're going to do the same thing, only instead of using a button, we're going to use a Particle.
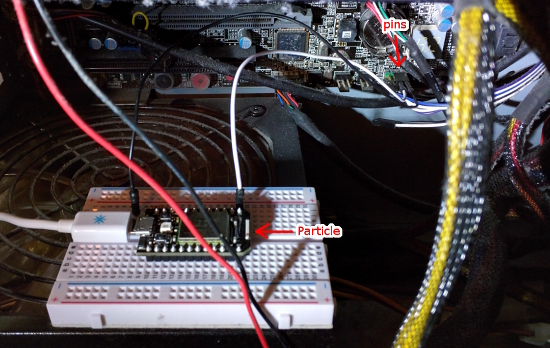
Wiring the Particle
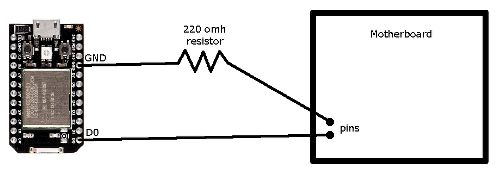
The circuit is pretty simple and with the right supplies you won't even need to solder anything! Once you've identified which pins on your motherboard are for the power, you can use the simple diagram below to wire everything up. All we're going to do is run a wire from one of the digital pins on the Particle to one of the power pins and then another wire from the Particle's ground to the other pin. I also added a small 220 ohm resistor to the ground wire just to make sure the Particle doesn't get fried.
Software
One of the nice things about Particle's boards is that they all communicate with Particle's cloud. This allows us to write our code through Particle's web interface and then the cloud can remotely flash the Particle. No need to open the case!
The following is the source code for our Particle:
/**
 * Mobo Power - Copyright 2015 Carter Yagemann
 *
 * This program allows a core to power on a motherboard over the internet!
 *
 * This program is free software: you can redistribute it and/or modify
 * it under the terms of the GNU General Public License as published by
 * the Free Software Foundation, either version 3 of the License, or
 * (at your option) any later version.
 *
 * This program is distributed in the hope that it will be useful,
 * but WITHOUT ANY WARRANTY; without even the implied warranty of
 * MERCHANTABILITY or FITNESS FOR A PARTICULAR PURPOSE. See the
 * GNU General Public License for more details.
 */

void setup() {
    // D0 will control the motherboard
    pinMode(D0, OUTPUT);

    // ATX boards maintain high power on their power pin and then ground
    // shortly to signal that the motherboard should power up. So we
    // normally want the pin to be in the high state.
    digitalWrite(D0, HIGH);

    // Register a function with Particle's cloud service so we can invoke
    // the core from over the internet.
    Spark.function("poweron", powerOn);
}

void loop() {
    // Nothing to do
}

int powerOn(String command) {
    // Switch the pin to low for half a second so the motherboard knows
    // it's time to turn on.
    digitalWrite(D0, LOW);
    delay(500);
    digitalWrite(D0, HIGH);

    return 1;
}
Once we've flashed our Particle with this software, all that's left is to use it!
Pressing the button... from anywhere in the world
You can communicate with your Particle through their REST API. The simplest way to do this is with a curl command:
curl https://api.particle.io/v1/devices/device_id/powerOn -d access_token=access_token
Where device_id is the ID for your Particle and the access_token is your account token.
And that's it! Hopefully you've found this tutorial to be useful. If you have any questions or comments, you can contact me via any of the means listed on my homepage.
Happy hacking!